Maintaining proper ear hygiene is an essential part of personal health. The ear canal is a delicate structure that naturally produces ear wax (cerumen) to protect the inner ear from dirt, dust, and bacteria. However, when excess ear wax builds up, it can cause discomfort, hearing problems, and even lead to infections. Traditionally, people have used cotton swabs or other methods to clean their ears, but these approaches are not always safe or effective. In recent years, ear cleaning camera have emerged as a more precise and risk-free way to manage ear hygiene at home.

An ear cleaning camera is a device that allows you to view the inside of your ear canal in real time, making it easier to remove excess wax and debris without causing harm. This article will explain how to use an ear cleaning camera for safe and efficient ear wax removal, as well as the benefits and precautions to consider.
What is an Ear Cleaning Camera?
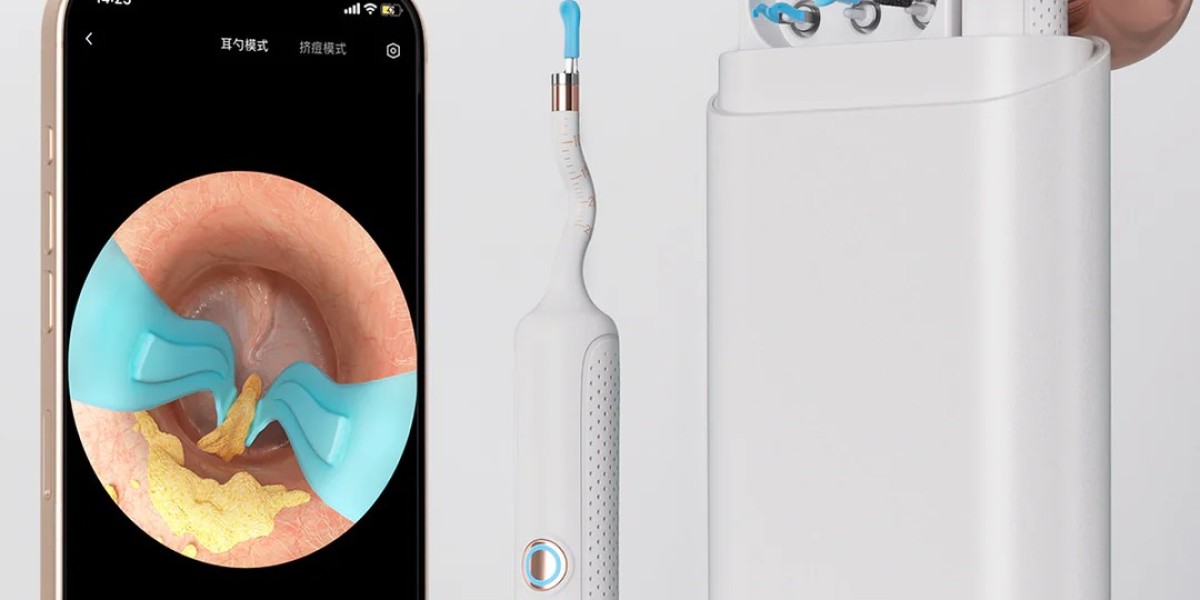
An ear cleaning camera is a small, handheld device that features a tiny camera mounted on the end of a flexible probe. This camera allows you to view the inside of your ear canal and monitor the condition of your ear wax. The device typically connects to a smartphone, tablet, or computer, where the live video feed is displayed, providing a clear and detailed view of the ear canal.
Ear cleaning cameras are equipped with LED lights to illuminate the ear, ensuring that you can see clearly, even in the dark, narrow passages of the ear canal. Some models come with additional features, such as magnification, adjustable brightness, or built-in tools like ear scoops or suction to assist with cleaning.
Benefits of Using an Ear Cleaning Camera
1. Precision and Accuracy
One of the primary advantages of using an ear cleaning camera is that it allows you to see exactly what you’re doing inside your ear canal. Unlike traditional methods like cotton swabs, which only clean the outer ear, an ear camera enables you to precisely target areas with excessive wax buildup. This reduces the risk of pushing wax deeper into the ear or causing injury to the sensitive ear canal or eardrum.
2. Safe and Risk-Free Cleaning
When used correctly, an ear cleaning camera ensures that you’re not inserting anything too deeply into the ear canal. This greatly reduces the chances of damaging the eardrum or injuring the ear canal, which can lead to pain, infections, or permanent hearing loss. With an ear cleaning camera, you can monitor the entire cleaning process, making sure you don’t cause any harm.
3. Real-Time Monitoring
Ear cleaning cameras offer the benefit of real-time monitoring. You can watch the live video feed on your smartphone or tablet as you clean, which helps you ensure that you are cleaning the ear effectively and safely. This visual feedback allows you to catch problems early, such as potential infections or blocked ear canals, and take appropriate action.
4. Convenience and Accessibility
Using an ear cleaning camera at home is not only convenient, but it also gives you the ability to check and clean your ears whenever necessary. You don’t have to wait for an appointment with a doctor or visit a clinic for professional ear cleaning. With the camera, you can take care of your ear hygiene in the comfort of your home, at your own pace.
5. Preventing Ear Infections
By using an ear cleaning camera, you can ensure that you’re cleaning the ear canal properly, reducing the risk of infections caused by improper ear care. Excessive ear wax can trap bacteria and fungi in the ear canal, leading to infections like otitis externa. Regular cleaning with an ear camera can help prevent such infections by allowing you to remove wax and debris safely.
How to Use an Ear Cleaning Camera for Ear Wax Removal
Using an ear cleaning camera for ear wax removal is a straightforward process, but it’s important to follow the right steps to ensure safety and effectiveness. Below is a step-by-step guide on how to use an ear cleaning camera:
1. Choose the Right Ear Cleaning Camera
Before you begin, make sure you have a reliable ear cleaning camera. When shopping for one, look for features such as:
Clear image quality: A high-resolution camera will help you get a clearer view of your ear canal.
LED lights: The camera should have built-in LED lights to illuminate the ear canal for better visibility.
Comfortable probe size: Ensure the probe is small and flexible enough to comfortably fit into your ear without causing discomfort.
Ease of connection: Most ear cameras connect to a smartphone or tablet via Wi-Fi or USB, so choose one that is compatible with your devices.
2. Prepare Your Ear Canal
Before using the camera, it’s a good idea to prepare your ear canal by softening the wax. This can be done by using ear drops, which are typically made with substances like hydrogen peroxide, saline, or olive oil. These drops help to loosen and soften the ear wax, making it easier to remove.
Apply a few drops of the solution into your ear, then let it sit for 5 to 10 minutes. Tilt your head to allow the solution to drain out naturally, and repeat the process if necessary for particularly stubborn wax.
3. Set Up the Camera
Once your ear canal is ready, set up the ear cleaning camera. Connect the camera to your smartphone, tablet, or computer as per the instructions provided by the manufacturer. Ensure that the device is properly positioned so you can clearly view the live video feed of your ear canal.
4. Insert the Camera Probe Into Your Ear
Gently insert the camera probe into your ear canal. Be cautious not to insert the probe too deeply—only a small part of the probe should enter the ear, just enough to get a clear view of the ear canal and any wax buildup. The camera’s built-in LED lights should illuminate the canal, helping you see clearly.
5. Monitor and Clean the Ear
As you move the camera probe around inside your ear, monitor the live video feed on your connected device. Look for areas with excess wax or debris that need to be removed. If the camera includes any cleaning tools, such as an ear scoop or brush, gently use these to remove the wax. If the camera features suction, you can use that to remove softer wax and debris.
Always ensure that you are removing the wax gently, without applying excessive pressure. The goal is to remove the excess wax, not to scrape or irritate the ear canal. If you come across any difficult-to-reach wax, avoid pushing it further into the ear and instead consider using ear drops or seeking professional help.
6. Inspect the Ear Canal
After cleaning, take a final look at the ear canal using the camera to ensure that it is clear of wax and debris. Make sure that you haven’t missed any spots. If you notice any redness, swelling, or signs of infection, it’s best to consult a healthcare provider rather than attempting to clean the ear further.
7. Clean the Camera Probe
After each use, clean the camera probe thoroughly to ensure that it is sanitary for the next use. Most ear cleaning cameras come with cleaning wipes or solutions, but you can also use mild soap and water to gently clean the probe. Avoid submerging the entire camera in water, as this may damage the device.
Precautions to Take While Using an Ear Cleaning Camera
Although ear cleaning cameras are generally safe, it’s important to follow some precautions to prevent injury or complications:
Do not insert the camera too deeply: Never insert the camera probe too far into the ear canal. Only a small portion of the probe should enter the ear to avoid damaging the ear canal or eardrum.
Be gentle: Use a light touch when cleaning your ear. The ear canal is sensitive, and excessive force can cause injury.
Avoid cleaning if you have ear problems: If you have a history of ear infections, a perforated eardrum, or other ear conditions, consult a doctor before using an ear camera for cleaning.
Stop if you experience pain: If you experience any pain, discomfort, or dizziness while using the ear camera, stop immediately and consult a healthcare provider.
Consult a professional: If you have impacted ear wax or if cleaning at home does not relieve your symptoms, seek professional help from an ENT specialist.
Conclusion
An ear cleaning camera is a modern and effective tool for removing ear wax safely and efficiently. By providing real-time visual feedback, an ear cleaning camera allows you to clean your ears with precision and avoid potential risks associated with traditional methods like cotton swabs. By following the proper steps and taking necessary precautions, you can ensure that your ear cleaning process is both effective and risk-free. Whether you’re looking to manage ear wax buildup, monitor the health of your ear canal, or prevent infections, an ear cleaning camera offers a safe and convenient solution for maintaining optimal ear hygiene