When it comes to maintaining an energy-efficient home, insulation plays a critical role. However, there are times when insulation removal becomes necessary, whether due to old age, water damage, or the presence of pests. If you're considering insulation removal, it's crucial to prepare your home properly to ensure a smooth and successful process. This guide will walk you through the steps to get your home ready for insulation removal, ensuring safety and efficiency every step of the way.
Why Insulation Removal is Important
Insulation serves as a barrier to keep your home comfortable by maintaining temperature consistency. However, over time, insulation can deteriorate, lose its effectiveness, or become contaminated. Removing old or damaged insulation is essential to prevent issues like energy loss, mold growth, and poor indoor air quality. By preparing your home for insulation removal, you can ensure that the process is done efficiently, setting the stage for new insulation that will enhance your home's energy efficiency.
Assess the Condition of Your Current Insulation
Before beginning the removal process, it’s important to assess the current condition of your insulation. This step helps determine the extent of the removal needed and highlights any areas of concern that require special attention.
Signs Your Insulation Needs to Be Removed
- Visible Damage: Water stains, mold, or pest infestations indicate that the insulation is compromised and must be removed.
- Loss of Efficiency: If your home’s heating and cooling costs have risen unexpectedly, deteriorating insulation could be the culprit.
- Age: Insulation materials degrade over time. If your insulation is several decades old, it may no longer be effective.
Gather the Necessary Tools and Equipment
Proper preparation includes gathering all the tools and equipment required for the insulation removal process. Having everything on hand will prevent delays and ensure that the job is completed efficiently.
Essential Tools and Supplies
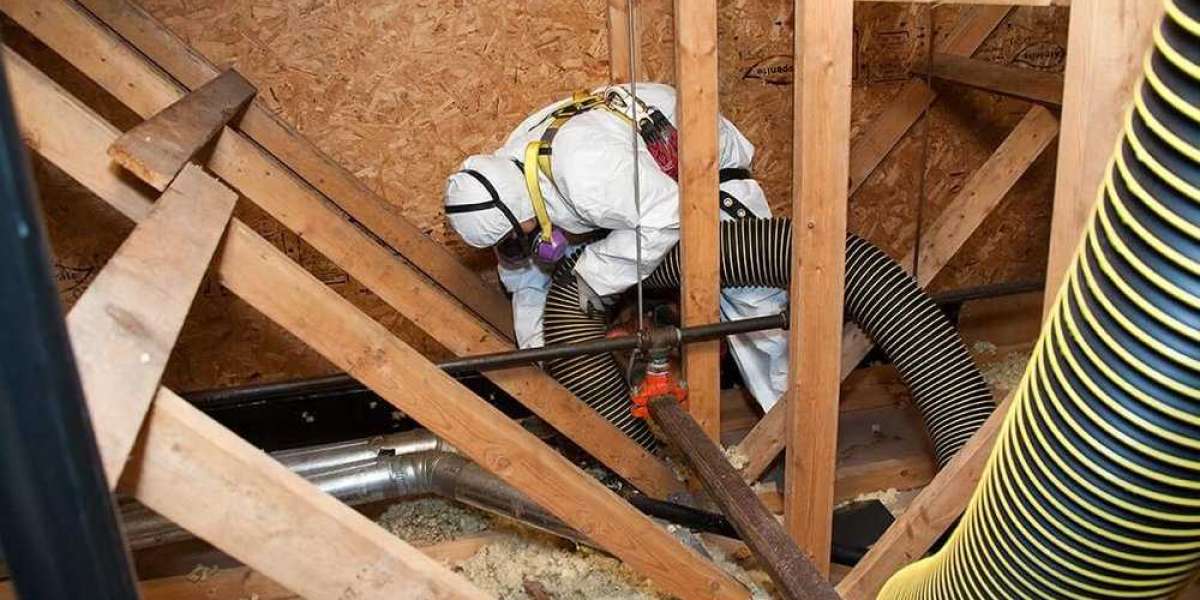
- Protective Gear: Safety goggles, gloves, masks, and disposable coveralls are crucial to protect against dust, debris, and potential contaminants.
- Vacuum with HEPA Filter: A high-efficiency vacuum can help collect insulation particles, ensuring minimal airborne contamination.
- Trash Bags: Heavy-duty trash bags are needed to dispose of the old insulation material properly.
- Ladders and Lighting: Adequate lighting and access to hard-to-reach areas are essential for thorough removal.
Seal Off the Work Area
Insulation removal can generate a significant amount of dust and debris, which can spread to other parts of your home if not properly contained. Sealing off the work area is a critical step to protect the rest of your home.
Steps to Seal Off the Area
- Use Plastic Sheeting: Cover doorways and vents with plastic sheeting to contain dust within the work area.
- Tape All Seams: Ensure that all edges and seams are securely taped to prevent dust from escaping.
- Close Off HVAC Systems: Temporarily shut off heating, ventilation, and air conditioning systems to avoid spreading contaminants through the ducts.
Plan for Safe Insulation Removal
Once the area is sealed off and your tools are ready, it’s time to plan for the safe removal of the insulation. Whether you’re handling the removal yourself or hiring a professional, safety should always be the top priority.
Safety Tips for Insulation Removal
- Avoid Direct Contact: Never touch insulation material with bare hands, as some types can irritate the skin.
- Minimize Dust: Use a spray bottle to lightly dampen the insulation before removal. This helps reduce airborne particles.
- Proper Disposal: Bag and seal insulation materials as you remove them to prevent dust from spreading.
- Work in Sections: Remove insulation in small sections to maintain control over the process and avoid overwhelming the work area.
Handling Specific Insulation Types
Different types of insulation require different approaches for removal. Understanding the type of insulation in your home will help you prepare for its safe and effective removal.
Common Insulation Types and Their Removal
- Fiberglass Insulation: This type is often found in batt or loose-fill form. It’s crucial to wear protective gear, as fiberglass can irritate the skin and lungs.
- Blown-In Insulation: Usually made of cellulose or fiberglass, blown-in insulation requires careful vacuuming or manual removal to avoid dispersing particles.
- Spray Foam Insulation: This type is more challenging to remove and may require professional assistance due to its adhesive nature.
Post-Removal Inspection and Cleanup
After the insulation has been removed, it’s important to conduct a thorough inspection and cleanup. This step ensures that your home is ready for new insulation installation.
Steps for a Thorough Cleanup
- Vacuum the Area: Use a HEPA-filtered vacuum to remove any remaining dust and particles from the work area.
- Check for Damage: Inspect the walls, floors, and ceiling for any signs of damage that may have occurred during removal.
- Sanitize the Space: Consider using a mild disinfectant to sanitize the area, especially if mold or pests were present in the old insulation.
Preparing for New Insulation Installation
With the old insulation removed and the area cleaned, you’re ready to prepare your home for new insulation. Proper preparation ensures that the new insulation will perform at its best, providing you with a comfortable and energy-efficient home.
Preparing the Space for New Insulation
- Repair Any Damage: Address any structural issues, such as leaks or cracks, before installing new insulation.
- Seal Air Leaks: Use caulk or spray foam to seal any gaps or cracks in the walls, floors, or ceiling to enhance the efficiency of your new insulation.
- Install Vapor Barriers: If necessary, install a vapor barrier to prevent moisture from penetrating the new insulation.
Hiring a Professional for Insulation Removal
While some homeowners may choose to tackle insulation removal themselves, it’s often a job best left to professionals. Hiring a professional insulation removal service ensures that the job is done safely and efficiently, with minimal disruption to your home.
Benefits of Professional Insulation Removal
- Expertise: Professionals have the experience and knowledge to handle various insulation types and remove them safely.
- Proper Equipment: A
professional insulation removal company will have the specialized tools and protective gear necessary to complete the job efficiently and safely.
- Disposal and Cleanup: Professionals handle the disposal of old insulation according to local regulations and ensure a thorough cleanup of the work area.
Insulation Removal in Phoenix and Surrounding Areas
If you’re located in Phoenix, Arizona, or nearby areas like Glendale, Superior, Mesa, Chandler, Tolleson, or Scottsdale, it’s essential to choose a local expert for your insulation removal needs. Local professionals understand the specific challenges posed by the Arizona climate and can provide tailored advice and services that suit your home’s needs.
Why Choose a Local Service?
- Familiarity with Local Conditions: A company that operates in Phoenix and surrounding areas will be familiar with the unique weather patterns and building standards, ensuring that your home is well-prepared for insulation removal and replacement.
- Quick Response Time: Local companies can provide faster service, minimizing the disruption to your daily life.
- Support Local Business: By choosing a local service provider, you contribute to the local economy and can expect more personalized service.
FAQs About Insulation Removal
- How do I know if my insulation needs to be removed?
You should consider insulation removal if you notice visible damage such as mold or water stains, experience increased energy bills, or know that the insulation is old and potentially less effective. - Is it safe to remove insulation myself?
While it is possible to remove insulation yourself, it can be hazardous if you’re not properly equipped or if the insulation contains contaminants like mold or asbestos. It’s often safer and more efficient to hire a professional. - How long does insulation removal take?
The time required for insulation removal depends on the size of your home and the type of insulation. A professional team can typically complete the job in a day or two for an average-sized home. - What happens to the old insulation?
Old insulation is typically bagged and disposed of in accordance with local regulations. Some materials may be recyclable, but this depends on the type of insulation and local recycling facilities. - Can I install new insulation immediately after removal?
Yes, but it’s crucial to ensure that the area is thoroughly cleaned, any damage is repaired, and any necessary air sealing or vapor barriers are installed before adding new insulation.
Conclusion
Preparing your home for insulation removal is a critical step to ensuring the process goes smoothly and safely. By taking the time to assess your current insulation, gather the necessary tools, and properly prepare your work area, you can make the removal process efficient and stress-free. Whether you choose to do it yourself or hire a professional, it’s essential to prioritize safety and thoroughness.
For residents of Phoenix and surrounding areas like Glendale, Superior, Mesa, Chandler, Tolleson, and Scottsdale, BW Insulation offers expert insulation removal services to help you maintain a comfortable and energy-efficient home. Reach out to them today at (520) 841-1517 to schedule your insulation removal and start the process of enhancing your home's comfort and energy efficiency.