Ear health is a critical yet often neglected aspect of overall well-being. Ear wax, or cerumen, is a natural substance that protects the ears from dust, debris, and bacteria. However, excessive ear wax buildup can lead to discomfort, hearing loss, and even infections. Traditional methods of ear cleaning, such as cotton swabs or ear candles, often come with risks and limitations. Enter the ear camera—a modern, innovative tool that has revolutionized ear care. This article explores what an ear camera is, how it works, and the ways it can transform your approach to ear hygiene.
What Is an Ear Camera?
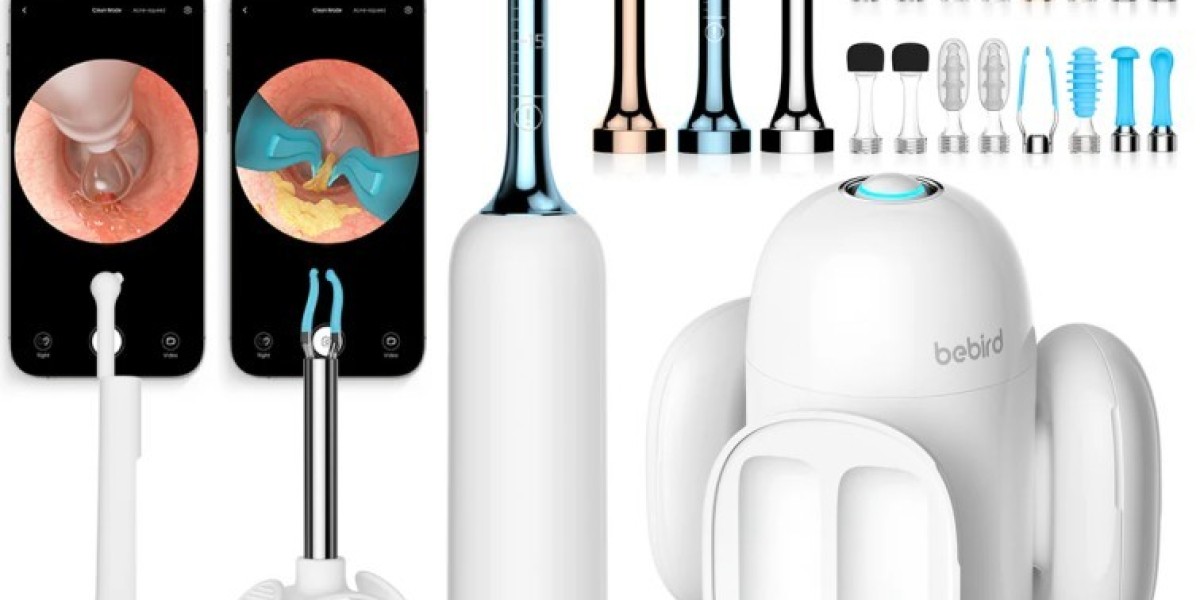
An ear camera, also known as an otoscope camera or ear cleaning camera, is a handheld device equipped with a miniature camera and LED light. It is designed to provide a clear, real-time view of the ear canal, allowing users to see inside their ears while cleaning or inspecting them. These devices often connect to smartphones, tablets, or dedicated screens, enabling users to visualize the ear canal on a larger display. Some ear cameras also come with interchangeable tips, such as scoops, loops, or brushes, for safe and effective ear wax removal.
Key Features of an Ear Camera
High-Resolution Camera: Provides a clear, magnified view of the ear canal.
LED Light: Illuminates the ear canal for better visibility.
Interchangeable Tips: Includes tools like scoops, loops, and brushes for different cleaning needs.
Connectivity: Connects to smartphones or tablets via Wi-Fi or USB for real-time viewing.
Portability: Compact and easy to use at home or on the go.
How Does an Ear Camera Work?
The ear camera combines advanced technology with user-friendly design to provide a safe and effective ear cleaning experience. Here’s how it works:
Insertion: The slender probe, equipped with a camera and LED light, is gently inserted into the ear canal.
Visualization: The camera transmits a live feed to a connected device, allowing you to see the inside of your ear canal in real-time.
Identification: Using the camera, you can identify areas of ear wax buildup, blockages, or other issues.
Cleaning: Attach the appropriate cleaning tool (scoop, loop, or brush) and gently remove the wax under visual guidance.
Monitoring: The camera allows you to monitor the cleaning process, ensuring thorough and safe removal of ear wax.
Benefits of Using an Ear Camera
1. Precision Cleaning
The high-resolution camera provides a clear view of the ear canal, enabling targeted and effective removal of ear wax. This precision reduces the risk of leaving behind wax or causing injury.
2. Enhanced Safety
Unlike traditional methods like cotton swabs, which can push wax deeper into the ear, an ear camera allows you to see exactly what you’re doing. This minimizes the risk of damaging the ear canal or eardrum.
3. Convenience
An ear camera allows you to clean your ears at home without the need for frequent visits to a healthcare provider. It’s a time-saving and cost-effective solution.
4. Educational Tool
Using an ear camera can help you better understand your ear health. You can identify issues like excessive wax buildup, inflammation, or early signs of infection.
5. Cost-Effective
While the initial investment may be higher than traditional methods, an ear camera can save money in the long run by reducing the need for professional ear cleanings.
6. Non-Invasive
The device is designed to be gentle on the ear canal, making it suitable for regular use without causing irritation.
How to Use an Ear Camera Safely and Effectively
Step-by-Step Guide
1. Prepare the Device
Charge the Device: Ensure the ear camera is fully charged.
Clean the Tips: Sanitize the interchangeable tips before use.
Connect to a Screen: If the device connects to a smartphone or tablet, set up the connection and open the corresponding app.
2. Position Yourself
Sit or stand in a well-lit area with a mirror if needed.
Tilt your head to the side to allow better access to the ear canal.
3. Insert the Device
Gently insert the camera probe into the ear canal. Do not push it too far; the camera will provide a clear view without deep insertion.
Adjust the angle to get a clear view of the ear canal on the screen.
4. Identify the Wax
Use the camera to locate the ear wax. Look for areas of buildup or blockage.
Avoid touching the eardrum or sensitive areas of the ear canal.
5. Remove the Wax
Attach the appropriate cleaning tool (scoop, loop, or brush) to the device.
Gently remove the wax, using the camera to guide your movements.
Take your time and avoid rushing to prevent injury.
6. Clean the Device
After use, remove the cleaning tool and sanitize it.
Wipe the camera lens and body with a clean, dry cloth.
7. Repeat if Necessary
If there is still visible wax, repeat the process carefully.
Avoid overcleaning, as this can irritate the ear canal.
Tips for Safe and Effective Use
1. Read the Instructions
Always follow the manufacturer’s guidelines for setup, use, and cleaning.
2. Use Gentle Movements
Avoid aggressive scraping or poking, as this can damage the ear canal or eardrum.
3. Do Not Overuse
Limit the use of the ear camera to when you notice significant wax buildup. Overcleaning can strip the ear of its natural protective wax.
4. Avoid Using on Children
Ear cameras are generally not recommended for children. Consult a pediatrician for safe ear cleaning options.
5. Do Not Use if You Have an Ear Infection
If you suspect an ear infection, avoid using the device and seek medical advice.
6. Keep the Device Clean
Sanitize the device and its attachments before and after each use to prevent infections.
Risks and Precautions
Potential Risks
Injury: Improper use can scratch the ear canal or damage the eardrum.
Infection: Using an unclean device can introduce bacteria into the ear.
Overcleaning: Removing too much wax can leave the ear canal dry and vulnerable.
Precautions to Take
Consult a Professional: If you’re unsure about using the device, seek guidance from a healthcare provider.
Stop if You Feel Pain: Discontinue use immediately if you experience pain or discomfort.
Avoid Sharing the Device: To prevent the spread of bacteria, do not share your ear camera with others.
Alternatives to Ear Cameras
If you’re not comfortable using an ear camera, consider these alternatives:
Ear Drops: Over-the-counter drops can soften wax, making it easier to remove naturally.
Manual Removal by a Professional: A healthcare provider can safely remove wax using specialized tools.
Ear Irrigation: A doctor can perform ear irrigation using a syringe and warm water or saline solution
When to Seek Professional Help
While ear cameras are effective, there are situations where professional intervention is necessary:
Persistent Symptoms: If you experience ongoing hearing loss, pain, or tinnitus.
Signs of Infection: Symptoms like discharge, swelling, or fever.
History of Ear Problems: If you have a history of eardrum perforation or ear surgery.
Conclusion
An ear camera is a revolutionary tool that combines advanced technology with user-friendly design to improve ear care. By providing a clear, real-time view of the ear canal, it enables precise and safe removal of ear wax, reducing the risk of injury and complications. Whether you’re dealing with excessive wax buildup or simply want to maintain optimal ear health, an ear camera offers a convenient, cost-effective, and non-invasive solution. However, it’s essential to use the device correctly, follow safety guidelines, and consult a healthcare professional if needed. By making informed decisions, you can protect your ears, improve your hearing, and enjoy better overall ear health.